Audio Configuration
Audio Function Introduction
This chapter describes the audio configuration and test methods under the Debian Weston desktop environment. Weston, as a Wayland compositor, does not provide a graphical audio settings interface like the GNOME desktop. The system manages audio input/output devices through the PulseAudio audio service. Users can check audio device status and adjust volume using the pactl command
Hardware Audio Channel Overview
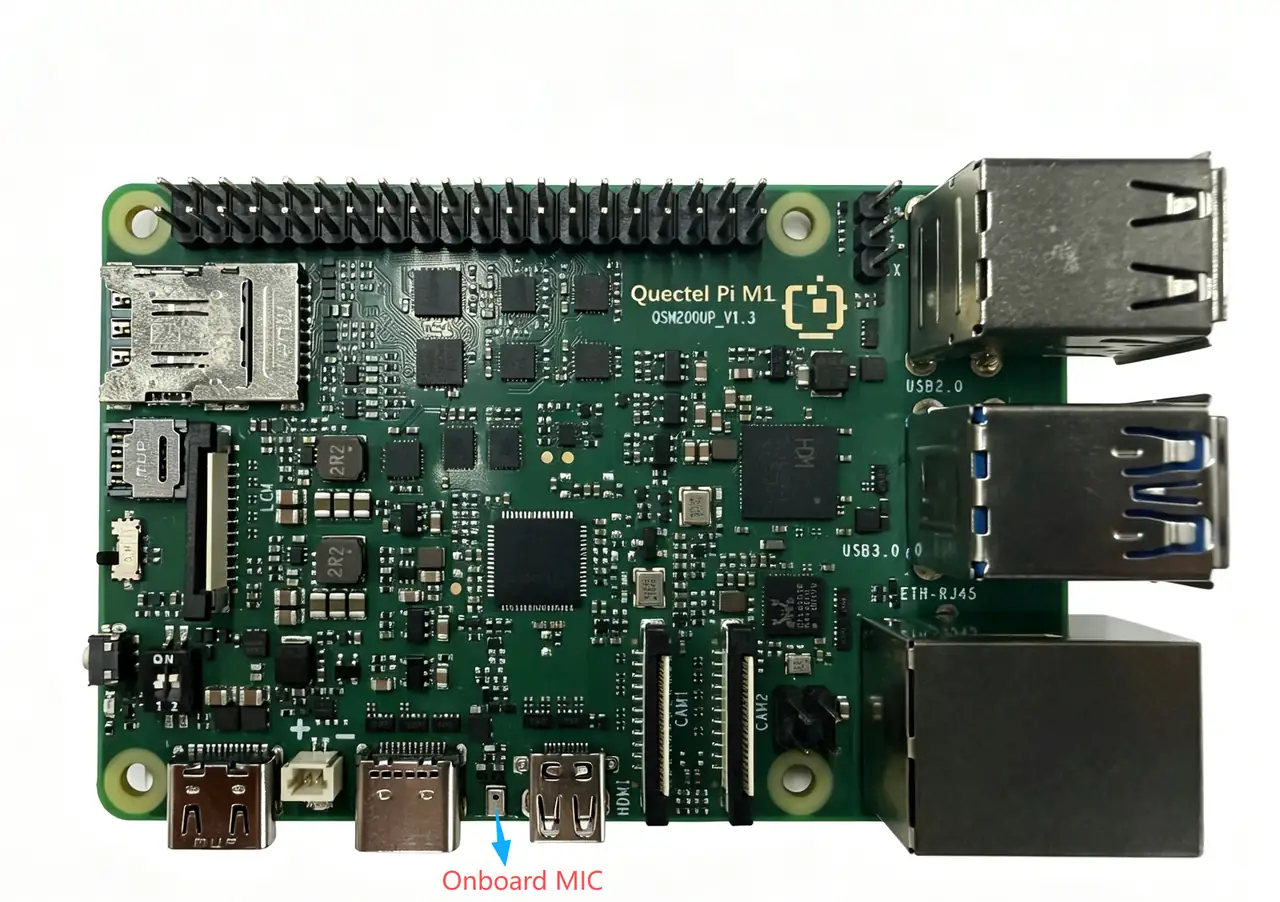
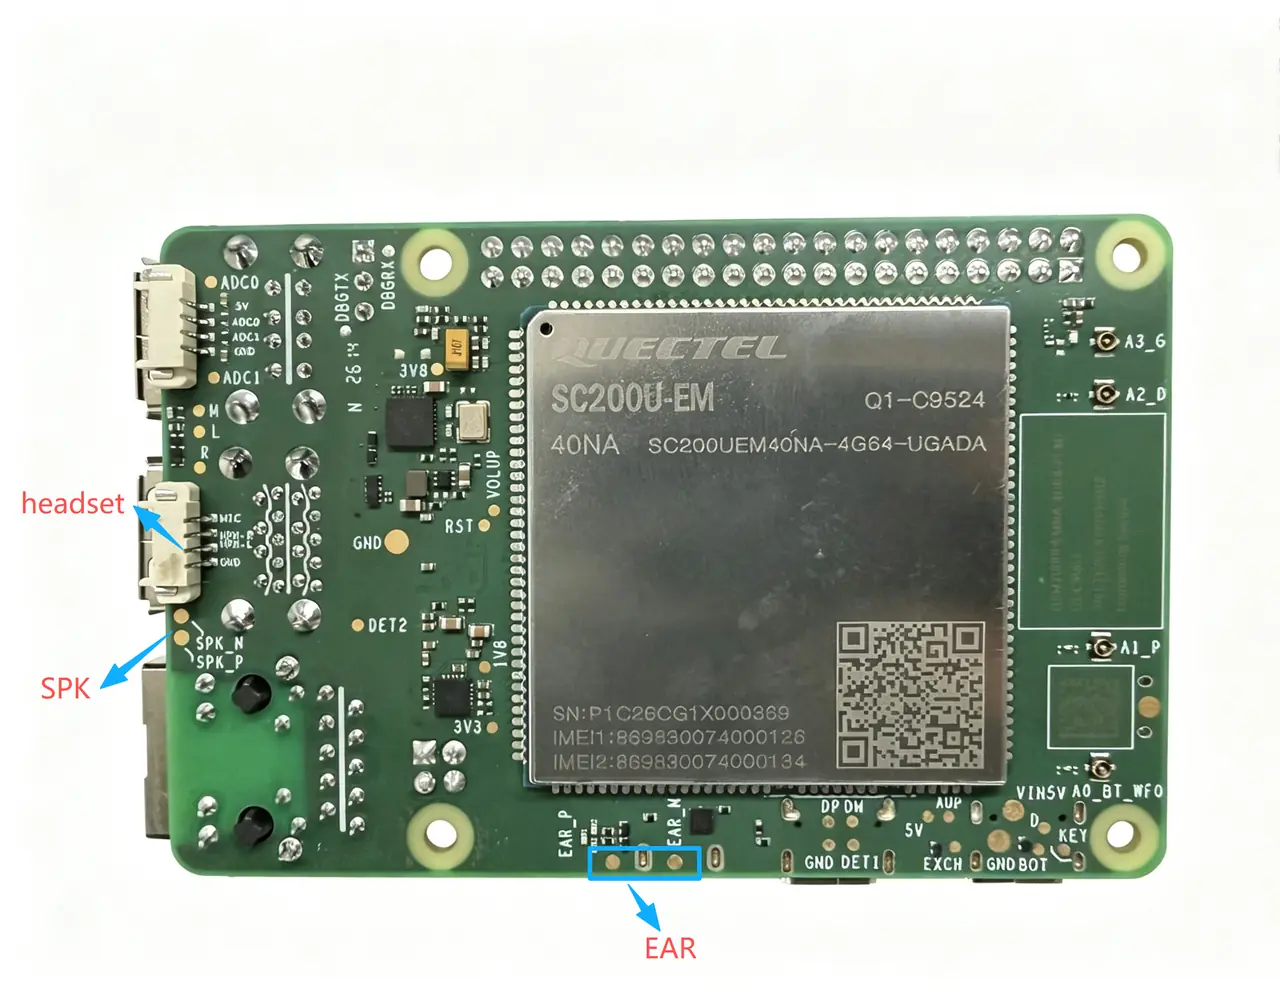
The M1/L1 development board’s audio hardware includes 2 input channels and 2 output channels, all implemented via the onboard SH1.0‑4P connector and onboard MEMS devices. Please ensure the hardware connections are correct before operation.
Channel Type |
Channel Name |
Hardware Location |
Description |
|---|---|---|---|
Input |
Onboard MIC |
MEMS microphone on the mainboard |
Built‑in silicon microphone; default recording input source; no external connection required. |
Input & Output |
Headset |
SH1.0‑4P connector |
External headset with microphone. |
Output |
SPK (Speaker) |
Reserved test points |
Drives high‑power external speaker (requires an external amplifier; direct connection to speaker results in low volume). |
Output |
EAR (Earpiece) |
Reserved test points |
Drives low‑power earpiece / headphone. |
Check Sound Card Information
You can check the loaded sound cards and PCM devices on the system with the following commands:
View the list of sound cards:
cat /proc/asound/cards

View the list of allocated PCM streams:
cat /proc/asound/pcm
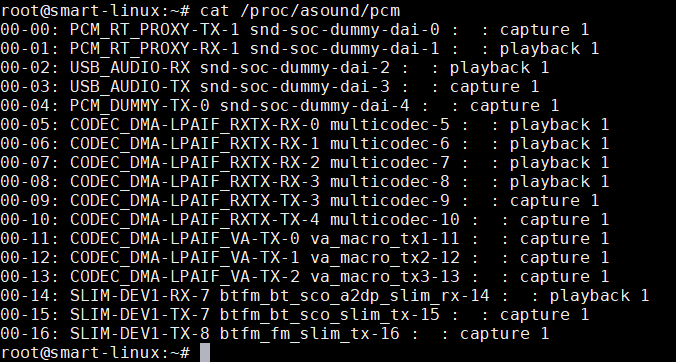
Note: If the system does not detect any sound card information or PCM streams, neither ALSA nor PulseAudio will function properly.
ALSA Architecture
ALSA Overview
ALSA (Advanced Linux Sound Architecture) is the underlying audio framework and driver core of the Linux system. It directly manages and controls the audio hardware of the computer. On one hand, it provides native drivers for sound cards, enabling direct read/write access to physical audio channels (such as external microphones, headphones, and speakers). On the other hand, it offers standardized API interfaces for applications to perform the most basic audio capture and playback. ALSA is the foundation upon which all higher-level audio services (such as PulseAudio) are built.
Audio Recording
Under the Linux system, confirm that the smart main control board’s audio configuration file /etc/backend_conf.xml is correctly configured (the system is configured by default):
<device name="CODEC_DMA-LPAIF_RXTX-TX-3" rate="48000" ch="2" bits="16" />
Onboard Microphone Recording
Before recording, you need to stop the PulseAudio service:
systemctl stop pulseaudio
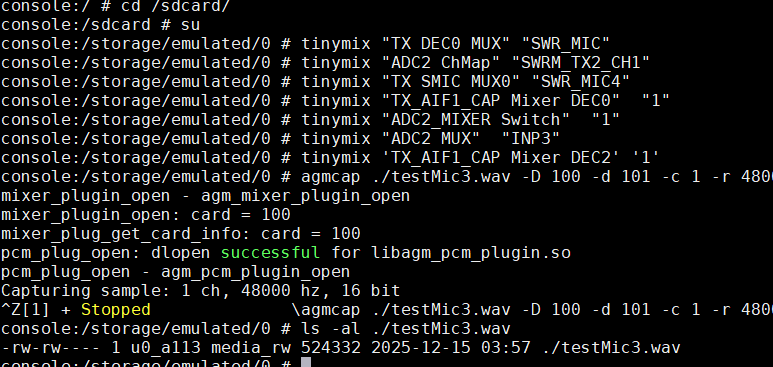
tinymix "TX DEC0 MUX" "SWR_MIC"
tinymix "ADC2 ChMap" "SWRM_TX2_CH1"
tinymix "TX SMIC MUX0" "SWR_MIC4"
tinymix "TX_AIF1_CAP Mixer DEC0"  "1"
tinymix "ADC2_MIXER Switch"  "1"
tinymix "ADC2 MUX"  "INP3"
tinymix 'TX_AIF1_CAP Mixer DEC2' '1'
agmcap /data/testMic3.wav -D 100 -d 101 -c 1 -r 48000 -i "CODEC_DMA-LPAIF_RXTX-TX-3"
To stop recording, press Ctrl + Z.
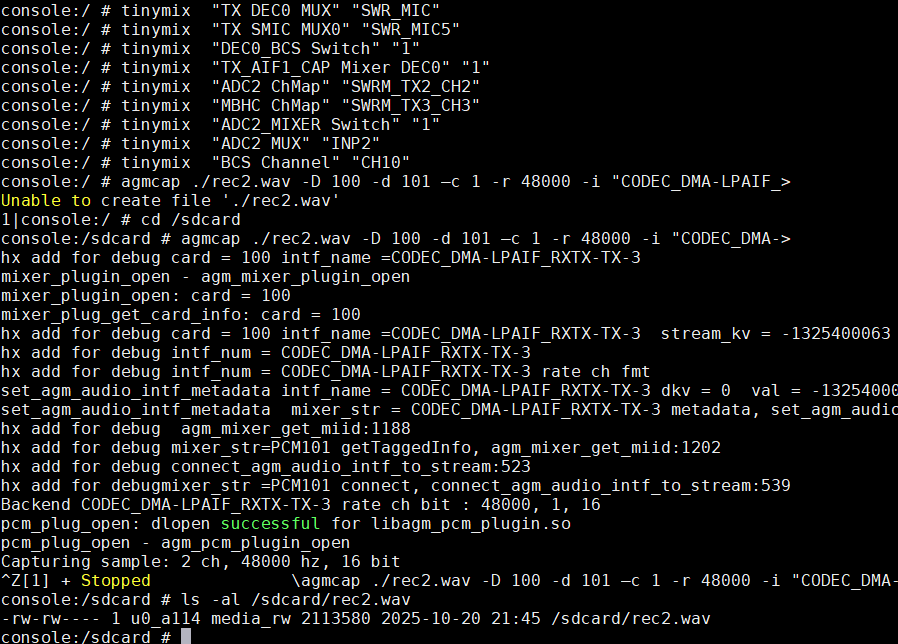
Headset (External) Microphone Recording
systemctl stop pulseaudio
tinymix  "TX DEC0 MUX" "SWR_MIC"
tinymix  "TX SMIC MUX0" "SWR_MIC5"
tinymix  "DEC0_BCS Switch" "1"
tinymix  "TX_AIF1_CAP Mixer DEC0" "1"
tinymix  "ADC2 ChMap" "SWRM_TX2_CH2"
tinymix  "MBHC ChMap" "SWRM_TX3_CH3"
tinymix  "ADC2_MIXER Switch" "1"
tinymix  "ADC2 MUX" "INP2"
tinymix  "BCS Channel" "CH10"
agmcap /data/rec2.wav -D 100 -d 101 -c 1 -r 48000 -i "CODEC_DMA-LPAIF_RXTX-TX-3"
Audio Playback
The onboard speaker is not soldered; please use the external headphone channel for playback.
Headphone Playback (3.5mm headphone)
systemctl stop pulseaudio
tinymix "RX_MACRO RX0 MUX" "AIF1_PB"
tinymix "RX_MACRO RX1 MUX" "AIF1_PB"
tinymix "RX INT0_1 MIX1 INP0" "RX0"
tinymix "RX INT1_1 MIX1 INP0" "RX1"
tinymix "RX INT0 DEM MUX" "CLSH_DSM_OUT"
tinymix "RX INT1 DEM MUX" "CLSH_DSM_OUT"
tinymix "RX_COMP1 Switch" "1"
tinymix "RX_COMP2 Switch" "1"
tinymix "HPHL Switch" "1"
tinymix "HPHR Switch" "1"
tinymix "HPHL_RDAC Switch" "1"
tinymix "HPHR_RDAC Switch" "1"
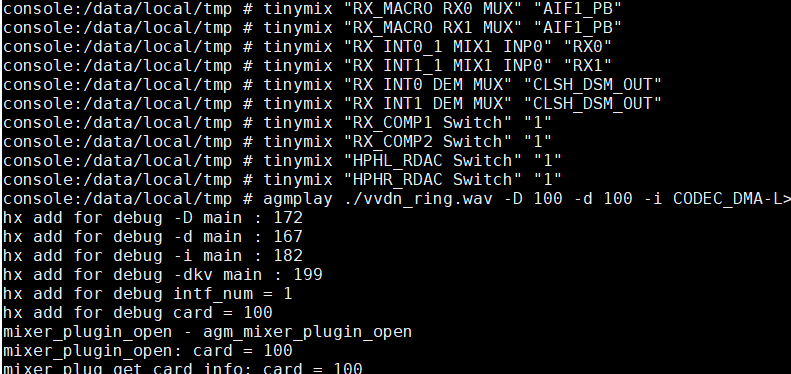
agmplay /data/vvdn_ring.wav -D 100 -d 100 -i CODEC_DMA-LPAIF_RXTX-RX-0 -dkv 0xA2000002
PulseAudio Architecture
PulseAudio Overview
PulseAudio is a cross-platform, network-capable audio service. It receives audio input from one or more sources (processes or input devices), and then redirects the audio to one or more sinks (sound cards, remote network PulseAudio services, or other processes). It interacts with the lowest-level ALSA and provides a unified interface for applications, thereby enabling advanced features such as multi-channel audio mixing and audio forwarding.
Device Inspection and Management
1. View Available Output Devices (Sinks)
To view the currently available audio output devices and their detailed information, use the following command.
This command lists the index and name of all available sinks (output devices). Example output:
sh-5.2# pactl list short sinks
To obtain more detailed device information, use:
sh-5.2# pactl list sinks
2. View Input Devices (Sources)
Similarly, you can view audio input devices (such as microphones) with the following command:
sh-5.2# pactl list short sources
To obtain more detailed device information, use:
sh-5.2# pactl list sources
Audio Recording
1. Onboard Microphone Recording
pactl set-source-port 4 speaker-mic
pactl -d 4 --file-format=wav output.wav
2. Headset Microphone Recording
pactl set-source-port 4 headset-mic
parec -d 4 --file-format=wav output1.wav
Audio Playback
1. Speaker Playback
pactl set-sink-port 1 speaker
paplay output.wav
2. Headphone Playback
pactl set-sink-port 1 headset
paplay output1.wav
Cellular Voice Call Test with qlril-api-test
In the Weston environment, there is no graphical dialing interface. Call control is performed through the qlril-api-test command‑line tool. This tool supports event registration, dialing, answering, and hanging up calls. Audio routing during a call still needs to be switched via PulseAudio commands (pactl).
Test Preparation and Initialization
Ensure that the SIM card is correctly inserted and the module has registered on the network.
Send the AT command AT$QCSIMAPP=? to check the network connection status:
AT\(QCSIMAPP=? \)QCSIMAPP: 0,“SUB1”,“L” # Network connected $QCSIMAPP: 1,“SUB2”,“No Service”
Before dialing or answering, use pactl to switch the audio channel to the desired device. Example:
#List current audio devices
pactl list short sinks
pactl list short sources

# Switch to headset channel
pactl set-source-port 4 headset-mic
pactl set-sink-port 1 headset

# Switch to onboard MIC recording + headset playback
pactl set-source-port 4 speaker-mic
pactl set-sink-port 1 headset
Open a terminal and execute the following command to start the qlril-api-test program:
qlril-api-test
Configure Event Listening
In order to receive incoming call and call status events, perform the following settings (the numbers below correspond to the command indices within the program):
# Enter 10 to enable the event listener
> 10

# Enter 12, then enter the start value 1000, then the end value 1070, to enable registered event listening
# (The end value can be adjusted according to the maximum value actually returned; new events may be added in SW)
> 12
> 1000
> 1070

# Enter 13 to suppress message events with IDs in the range 1009~1009 (adjust as needed)
> 13
> 1009
> 1009
Answer an Incoming Call (Terminated Call Test)
When the auxiliary device calls the test device, the qlril-api-test window will report an incoming call event, similar to:
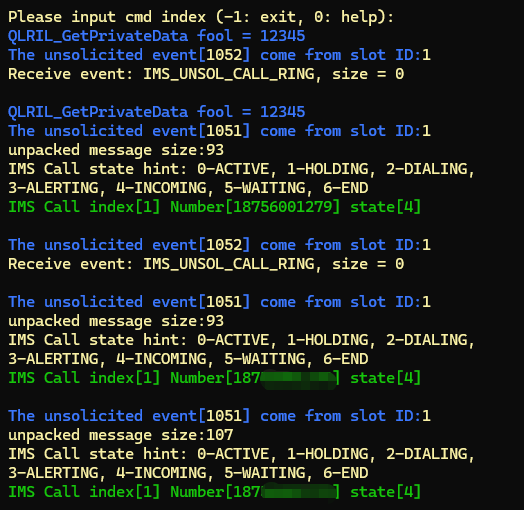
Then perform the following to answer:
#Enter 44 to answer the incoming call
> 44
After answering, the call should be established. If there is “no sound during the call”, please check whether the audio routing is correct.
Hang Up a Call
After the call ends, execute:
# Enter 43, then select 1 (hang up the current call)
> 43
> 1
The call will then be hung up, and the interface should indicate a successful hang‑up.
Dial Out (Originating Call Test)
To initiate a call, use the following command (assuming the number is 10086):
# Enter 43, then enter the phone number
> 43
> 10086
After dialing, the system will place the call, and the other party can answer to start the conversation.
Expected Results and Actual Observations
Expected result: Incoming call events are clearly reported; 44 can answer normally; the call is established with normal audio; the hang‑up command 43->1 terminates the call properly.
In actual testing: Answering may succeed but there could be no sound during the call. In this case, please first check the audio routing settings (whether the correct headset and MIC sources are selected) and confirm that the hardware connections are intact. This issue is usually related to PulseAudio configuration or ALSA mixer settings; developers can investigate further on their own.